

Create a CRUD API Using Expressjs and Mongo db
Create a CRUD API with Nodejs Express and Mongo db with every step of the way explained


Introduction
if you just want to jump to action go to the setting up section👍
A CRUD API (Create, Read, Upda,te and Delete) is one of the most basic types of API available. It allows users to access data through the API by performing Create, Read, Update, and Delete operations on certain endpoints of the API. For instance, if you have an eCommerce website you could use this type of API to allow users to create thein accounts, get information about products in the catalog, change their shipping address, and much more! Let's take a look at how to build a CRUD API using Node.js and Express in this tutorial! But this blog won't be explaining what the code means. I am having a BONUS section on tips to deploy the app
What is CRUD?

CRUD stands for Create, Read, Upda,te and Delete. It is a set of operations to manage data in databases or other storage systems. CRUD is an acronym that stands for Create, Read, Update and Delete, which are the four primary functions of persistent storage.
It is Just Simple, Create, Read, Update, and Delete.CRUD😁
Why use Node.js and Express?
When building a CRUD API, it's important to consider the end user's experience. Node.js provides developers with an extensive library of JavaScript functions and methods that can be useto build a web application quicklyon. Its asynchronous nature allows for faster response times for users, and its lightweight design makes it more efficient for scaling projects up and downExpress is alsois a great choice for developing APIs as it provides developers with thy tools to create routes, endpoints, and database calls with minimal effort. By leveraging Node.js and Express, developers can create a fast, secure, and reliable CRUD API in no time.
This powerful combination of technologies can handle complex operations such as reading, writing, updating, and deleting data from a database with ease. It also provides developers with an easy-to-use framework that helps them stay organized when building their applications. Additionally, developers can quickly develop mobile applications with Node.js and Express as well, making it easier to reach a larger audience on the go. In conclusion, building a CRUD API with Node.js and Express is an efficient way to create a lightweight and powerful web application that is secure and reliable.
With its asynchronous nature and extensive library of functions and methods, Node.js provides developers with the necessary toolto build a web application quicklyon. Additionally, Express makes it easy to develop APIs and mobile applications with minimal effort. By leveraging the combination of Node.js and Express, developers can create an efficient and reliable CRUD API in no time!
Setting up your project
So let's Start🔥.First lets create a folder for out project
mkdir crud_project
Then If not installed install Node js
Install from terminal (Windows)
winget install OpenJS.NodeJS.LTS
Install from terminal (Mac OS)
curl "https://nodejs.org/dist/latest/node-${VERSION:-$(wget -qO- https://nodejs.org/dist/latest/ | sed -nE 's|.*>node-(.*)\.pkg</a>.*|\1|p')}.pkg" > "$HOME/Downloads/node-latest.pkg" && sudo installer -store -pkg "$HOME/Downloads/node-latest.pkg" -target "/"
Install from terminal (Linus)
sudo apt-get update && sudo apt-get upgrade
sudo apt install nodejs
Now Initialize Node -
npm init
Install All the Dependencies -
npm i mongoose express dotenv cors
Install NodeMon For Live Editing
npm i nodemon -D
we are installing nodemon as a dev dependency which means it is only for development not for deploying that's why we have -D flag. Know More
Once you have done that it's Coding time
First Create The index file in the folder -
touch index.js
open the file with any text editor of your choice
First Lines of Code in The Project
add the following to index.js
const express = require('express');
const app = express();

app.listen(3000, () => {
 console.log('Server is running on port 3000');
})
you first required express call it using express() and listen to port 3000.
Let's Spin Up The Server using Nodemon💫
nodemon index.js
Yay We Have a server up and running 🙌😀
Setting up MongoDB

So There are two ways you can do it either offline or online. here we are showing the online way because it is fast
First Create an account at https://www.mongodb.com/atlas/database.Mongo DB altas allows us to have databases in the cloud seamlessly. pretty useful
After you created an Account smash that create project button
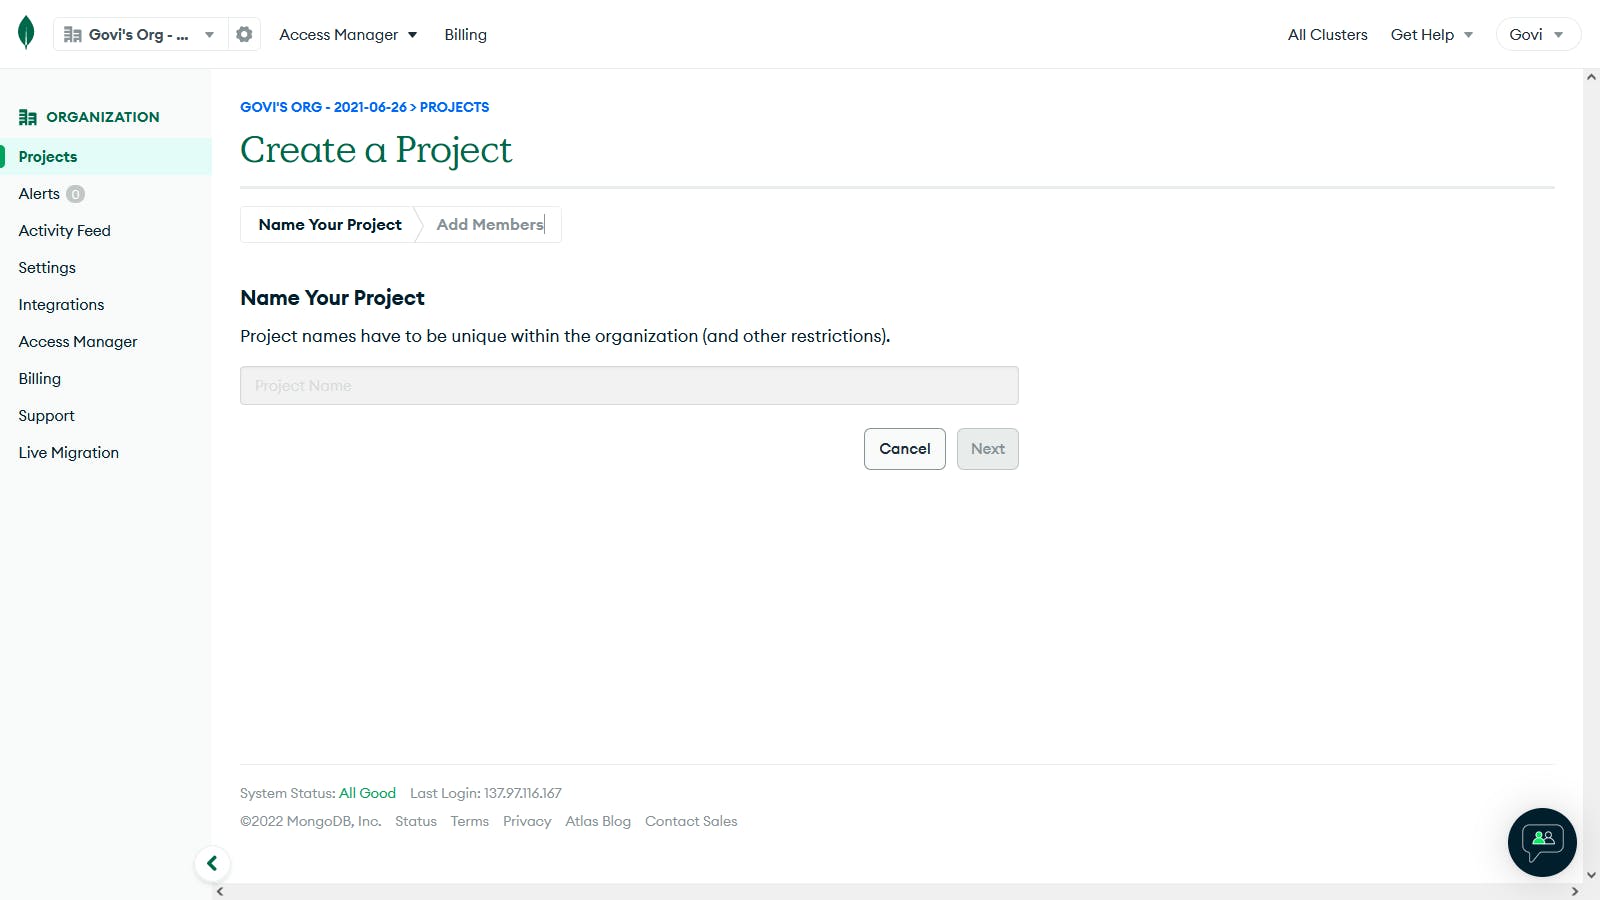
Select a name for the project and click next then click create a project. then you will have a select option like this
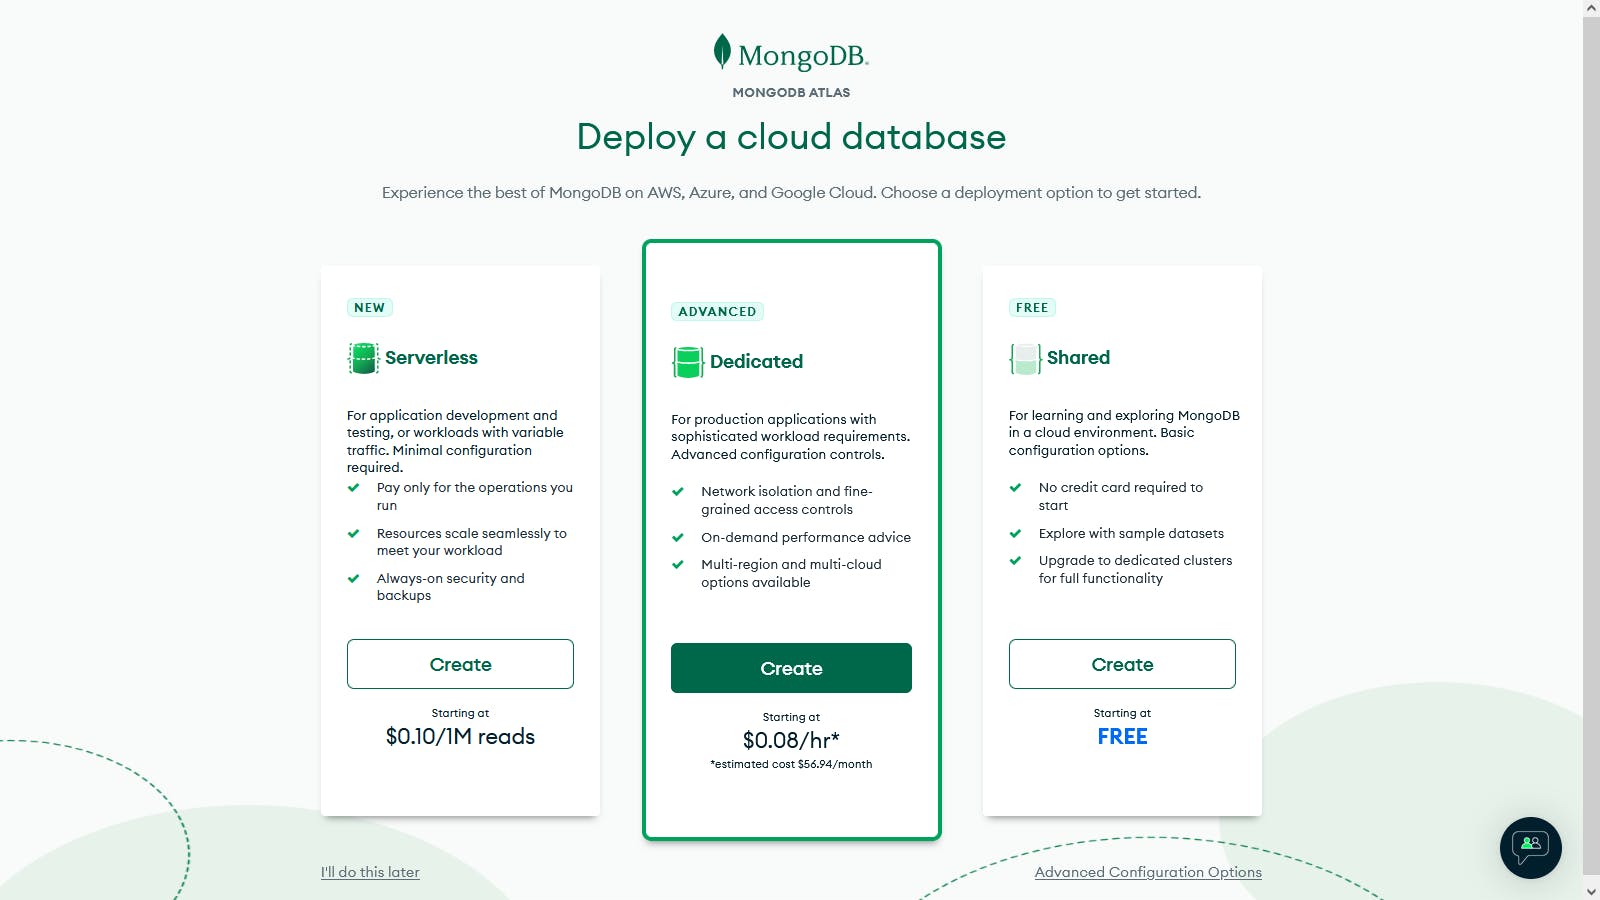
Select Shared and click Create.then you will be asked the cluster details
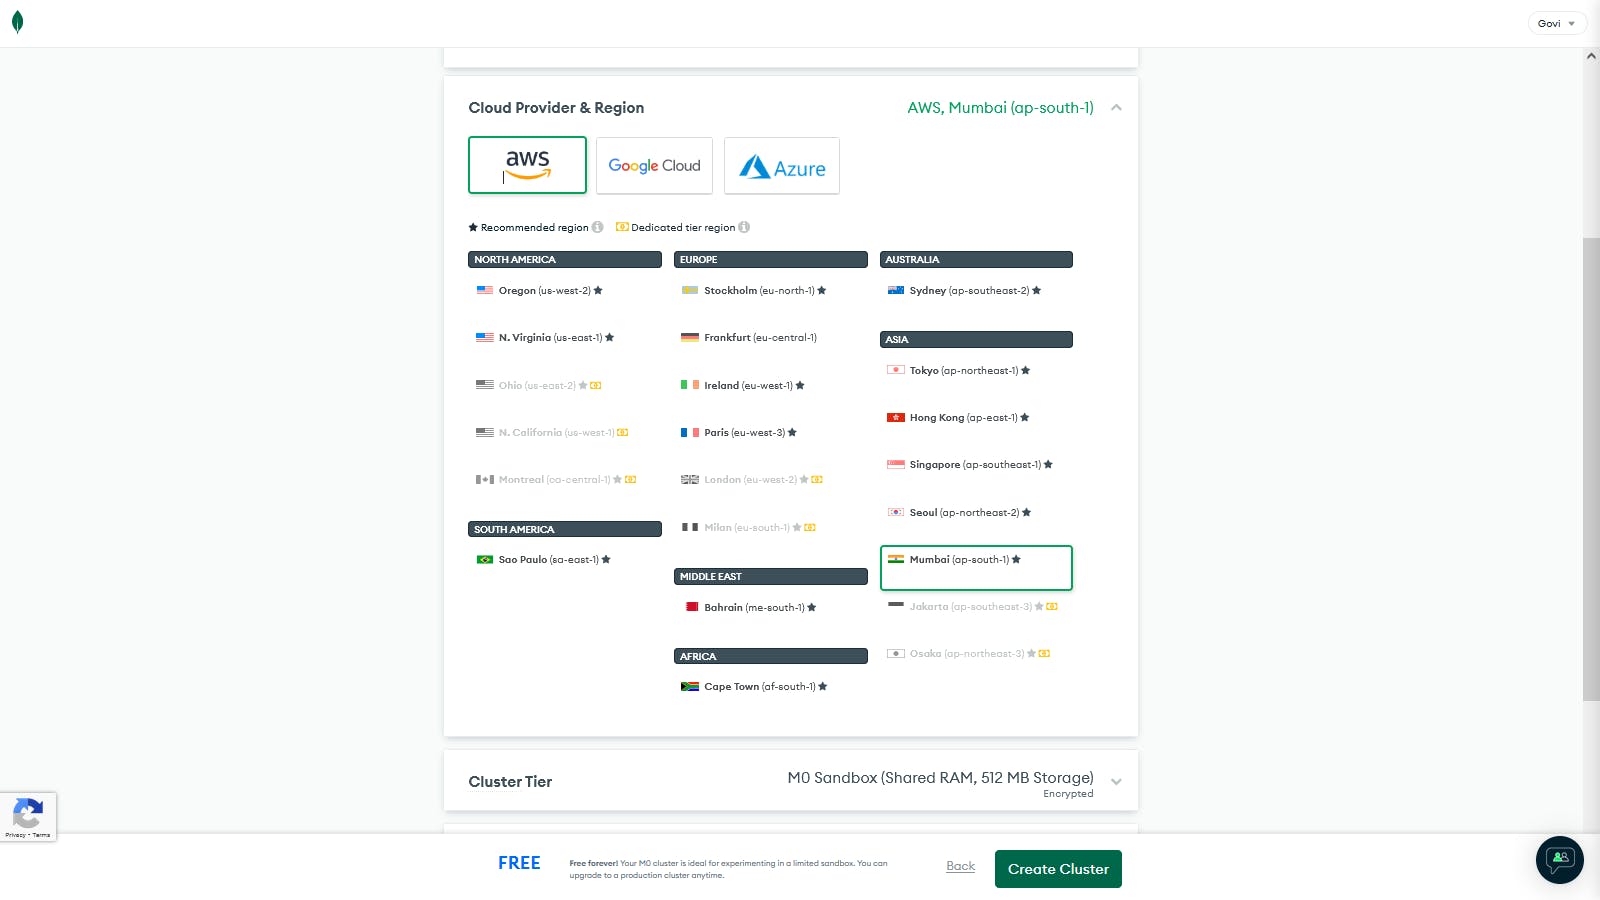
Just Go With the Defaults and click create cluster
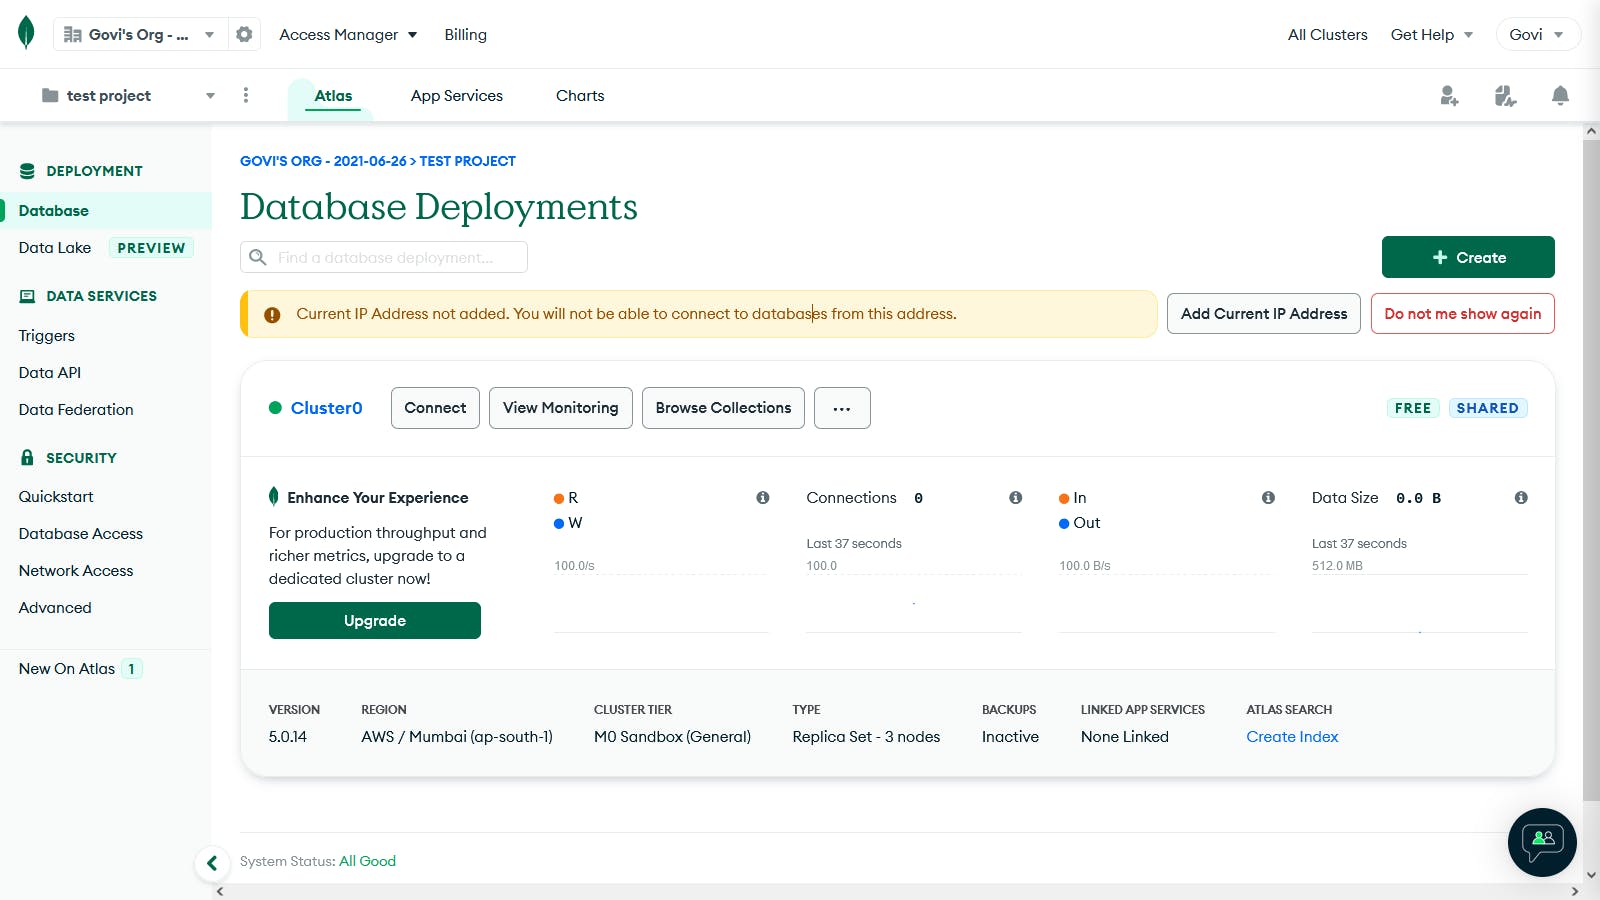
After the cluster setup is complete click connect
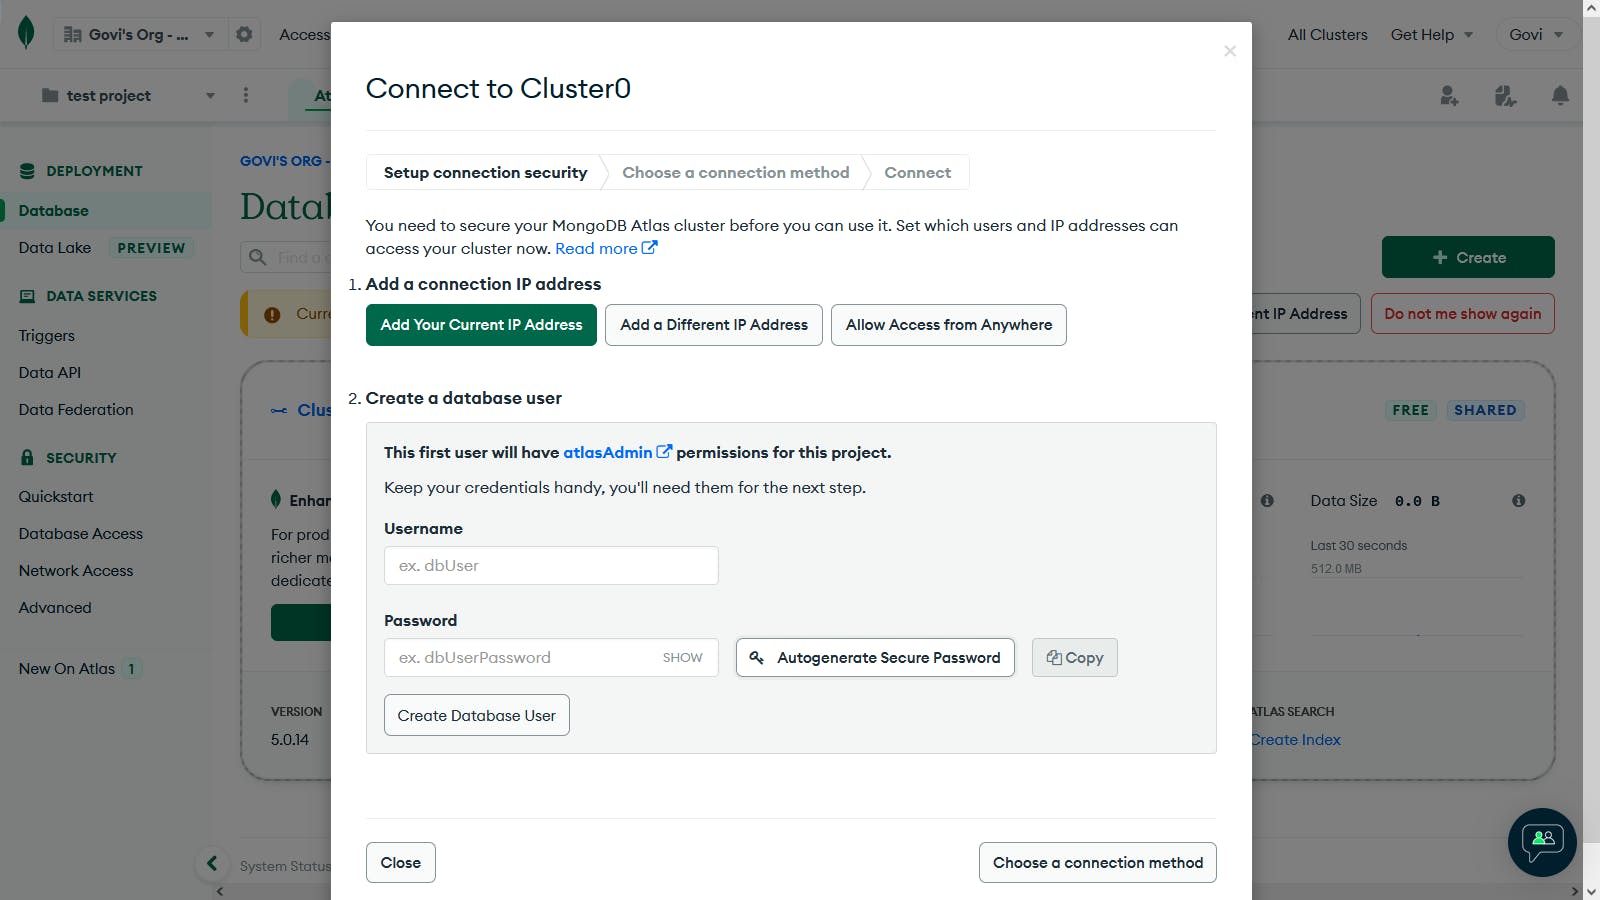
Choose Allow Access From Anywhere You can choose to add IP but for the sake of the simplicity of this blog, I will choose to allow access from anywhere. and click add If there is a button that says so
Also, Create a Database User, Only with One We can connect to the database
You can change These at any time in Database Access and Network Access😄
Click Choose a Connection method and click Connect to your Application
copy the connection string given.bytheway the connection string is made up of different parts. better know them that have the wrong connection string🙊
mongodb+srv://<your_database_username>:<your_database_user_password>@<clustername_and_url>/?retryWrites=true&w=majority
The URL includes the database username and database user password importantly. if you change the username you have to change the username in the URL you changed password you have to change the password of that user in the URL.
The URL given by MongoDB only has the username and cluster_name given you have to fill the <password> part with your password for example
mongodb+srv://Govi2020:supersecretpassword@cluster0.xgjwy0t.mongodb.net/?retryWrites=true&w=majority
if you forget the password😱; no Sweat you can always edit the password and username in the Database Access menu.Don't forget also edit the username and password in the url😊
And Just Like that the Database is All Good To GO🤩
Connecting To MongoDB

Hey Now let's Connect to Mongo DB🚀
First, let's Create a separate file just for the DB connection so that we can keep our code clean🧼
touch db.js
and also create a .env file for storing MONGO_DB_URL
MONGO_DB_URL=mongodb+srv://<username>:<password>@<cluster_details>.mongodb.net/myFirstDatabase?retryWrites=true&w=majority
don't forget to replace this URL with your which you have filled in with the password
and to use the env file, in index.js add this at the top
const express = require("express");
const app = express();
const dotenv = require("dotenv");
dotenv.config();

app.listen(3000, () => {
    console.log("Server is running on port 3000");
});
so in order to use env variables in our projects we have to call the config function in the dotenv module as simple as that👍
then add the following in db.js
const mongoose = require("mongoose");

mongoose
  .connect(process.env.MONGO_DB_URL, {
      useNewUrlParser: true,
      useUnifiedTopology: true
  })
  .then(() => {
    console.log("Connected to MongoDB");
  })
  .catch((err) => {
    console.log(err);
  });
we are requiring mongoose which helps us use mongo DB with ease and then we are connecting to the DB using the connect method. we get the value of the environment variable MONGO_DB_URL using the process.env.MONGO_DB_URL.it will work since we have set it up in the previous code block. then as the second parameter, we give them a config object. you search up the config if you want to but it's not very important right now😊
then at last let's connect the file db.js to the main file,index.js
const express = require("express");
const app = express();
const dotenv = require("dotenv");
dotenv.config();
require("./db");

app.listen(3000, () => {
    console.log("Server is running on port 3000");
});
In the terminal type this in the folder to get the file up and running
node index.js
if you are getting Connected to MongoDb log then it is successful if not check you code and review the blog
Let's Create Routes

So Let's Start Implementing the Code For Routes.So Let's create a router.js to manage all the routes
touch router.js
now in the router.js lets initialise the router
in the router file type
const express = require('express');
const router = express.Router();

// get all of the posts
router.get('/', (req, res) => {
  res.send('The Posts Data will be shown here');
});

// get one post
router.get('/:id', (req, res) => {
  res.send('The Posts Data will be shown here');
});

// create a post
router.post('/', (req, res) => {
  res.send('New Posts will be created here');
});

// update a post
router.put("/:id",(req,res) => {
    res.send('The Posts will be updated here')
})

// delete a post
router.delete("/:id",(req,res) => {
    res.send('The Posts will be Delected here')
})

module.exports = router;
we are creating a router then defining all of the routes needed like get for getting all the posts,post for creating posts,put for updating posts,delete for delecting a post
All of these get, put,post, delete function needs two parameters
// router.get(The Url,The function)
//eg:
router.get("/posts",(req,res) => {
})
// the function is given two arguments
// first the req argument - contains all of the data about the request like the cookies,the request body etc
// second res argument - container all of the data and function for the responce the request, eg: res.send() - gives the responce to the request
The url could be dynamic like
router.get("/posts/:id",(req,res) => {

})

// In the url we put "/posts/:id"
// /:id is the dynamic part
// meaning it could be anything like "sdsfg"
// means the url could be "/posts/dsfds" or "/posts/thepostid"
// these paramenters can be accessed in the code using req argument given by the call back function

// eg:
router.get("/posts/:id",(req,res) => {
    // to access it you need to type :
    console.log(req.params.id);
    // req.params.TheNameYouPutInTheURL
})
lets use the router in the index.js,In the top of index.js write
const express = require("express");
const app = express();
const dotenv = require("dotenv");
const router = require("./router.js")

dotenv.config();
require("./db")
app.use(express.json())
app.use(router)
we are using the router using the app.use function by express 😵
And Also we are using express.json() middleware for parsing the data if the body is json otherwise it will say undifiened.basically if you plan to send json data between client and server then you need to add this middleware
Since we got all of these covered lets move on and create a model
Creating a Model and Schema
create a file called Post.js in a new folder called Models
mkdir models
cd models
touch Post.js
in Post.js write
const mongoose = require("mongoose");

const PostScheme = new mongoose.Schema({
    title: String,
    description: String,
    liked: Number,
});

const Post = mongoose.model("posts", PostScheme);

module.exports = Post;
we first import mongoose and creates a Schema
A Schema defines how the data in the collection should be like,for example the in out application post should have a title and description which is a String type and liked which is a number
Then we create a model has the parameters of the name of the collection and the Schema of it.the model is just a collection in the database
Then export the model
Write the Code for CRUD
Since we got all of these done let's start implementing CRUD
in router.js let's import the model
const Post = require("./models/Post.js")
in the router.js in the edit post request callback
// create a post
router.post("/", (req, res) => {
    console.log(req.body)
    const newPost = new Post(req.body);
    newPost.save().then((item) => {
        res.json(item);
    }).catch((err) => {
        res.status(500).send(err);
    });
});
As I said I am creating new Data in Post model/collection.req.body is the body given by the sender
newPost.save() - saves data in the database
And after we save it we are returning the info in the database about the data to the requested sender
if there is an error in the database operation then we are catching the error and returning it with the status code code of 500
( BTW .status(500) is used to tell which code should we return, it's a status code.500 is used for server error.
for more info visit: https://developer.mozilla.org/en-US/docs/Web/HTTP/Status )
let's now also write the code for getting all the posts, For That the get request
// get all of the posts
router.get("/", (req, res) => {
    Post.find((err, posts) => {
        if (err) {
            res.status(500).send(err);
        } else {
            res.json(posts);
        }
    });
});
we are using the find() function in the Post model/collection to get all the posts and check if there is an error then return it and if else then return the data in the database.
let's write the code for getting only one post by id, (Note: An Id field is given to all of the data in a mongo database)
// get one post
router.get("/:id", (req, res) => {
    Post.findById(req.params.id, (err, post) => {
        if (err) {
            res.status(500).send(err);
        } else {
            res.json(post);
        }
    });
});
here we are getting the id they put in the URL and using it to find the specific post
Then lets update using put callback function
// update a post
router.put("/:id", (req, res) => {
    Post.findByIdAndUpdate(req.params.id, req.body, (err, post) => {
        if (err) {
            res.status(500).send(err);
        } else {
            res.json(post);
        }
    });
});
We are using findByIdAndUpdate function of the model which is self explanatory.we are giving it the id in the URL for finding the post and giving req.body for updating for example :
// If the Post's Previous Data is
{
    title: "Hello",
    description: "How are you",
    likes: 6
}
// And We Put this in the req.body
{
    title: "Hi",
    likes: 10
}
// Then the final and updated data will be :
{
    title: "Hi",
    description: "How are you",
    likes: 10
}
I hope you understand 😇. Now let's end the routing with the Delete function
// delete a post
router.delete("/:id", (req, res) => {
    Post.findByIdAndRemove(req.params.id, (err, post) => {
        if (err) {
            res.status(500).send(err);
        } else {
            res.json(post);
        }
    });
});
I think by now the code itself is self-explanatory. We are finding the post using the id in the URL and removing it; that's it
if you have followed along with me your router.js file should have this code:
const express = require("express");
const router = express.Router();
const Post = require("./models/Post.js");

// get all of the posts
router.get("/", (req, res) => {
    Post.find((err, posts) => {
        if (err) {
            res.status(500).send(err);
        } else {
            res.json(posts);
        }
    });
});

// get one post
router.get("/:id", (req, res) => {
    Post.findById(req.params.id, (err, post) => {
        if (err) {
            res.status(500).send(err);
        } else {
            if (!post) return res.status(404).send({message:"Post Not Found"});
            res.json(post);
        }
    });
});

// create a post
router.post("/", (req, res) => {
    console.log(req.body)
    const newPost = new Post(req.body);
    newPost.save().then((post) => {
        res.json(post);
    }).catch((err) => {
        res.status(500).send(err);
    });
});

// update a post
router.put("/:id", (req, res) => {
    Post.findByIdAndUpdate(req.params.id, req.body, (err, post) => {
        if (err) {
            res.status(500).send(err);
        } else {
            res.json(post);
        }
    });
});

// delete a post
router.delete("/:id", (req, res) => {
    Post.findByIdAndRemove(req.params.id, (err, post) => {
        if (err) {
            res.status(500).send(err);
        } else {
            res.json(post);
        }
    });
});

module.exports = router;
Now Let's Test It
Before
You can use any client for testing the API the most popular one is postman but here i will be using an vs code extension named Thunder Client for testing
You can follow along without Thunder Client and use postman it won't be very different
GET ALL POSTS Request
First, I am going to create a new request if you are using postman i think it is just a new button in the top of the sidebar or something
Since our PORT was 3000 in index.js we have to make a request in the localhost:3000 to access it
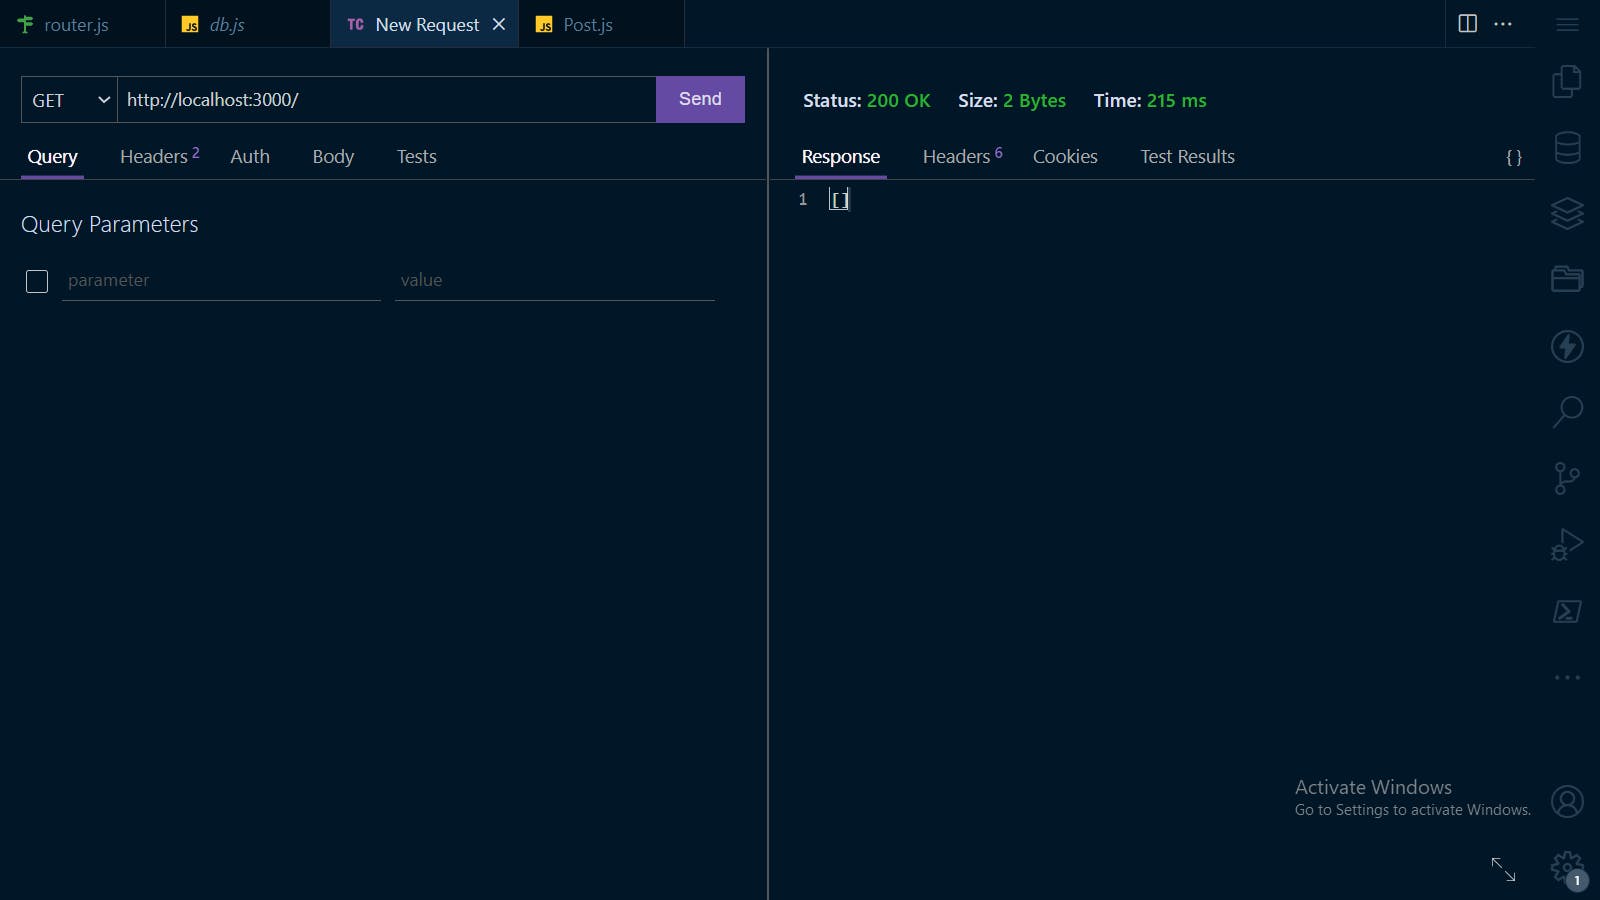
And It will send you back a empty array because there is no data in the collection yet and the default GET "/" will give us the get-all post function
POST Request
So to test it let's create a post.by changing the request type to post and in the body write
{
    "title":"Please Add a Reaction to my blog",
    "description":"I have worked hard for this blog so please",
    "likes": 0
}
it will give this in return
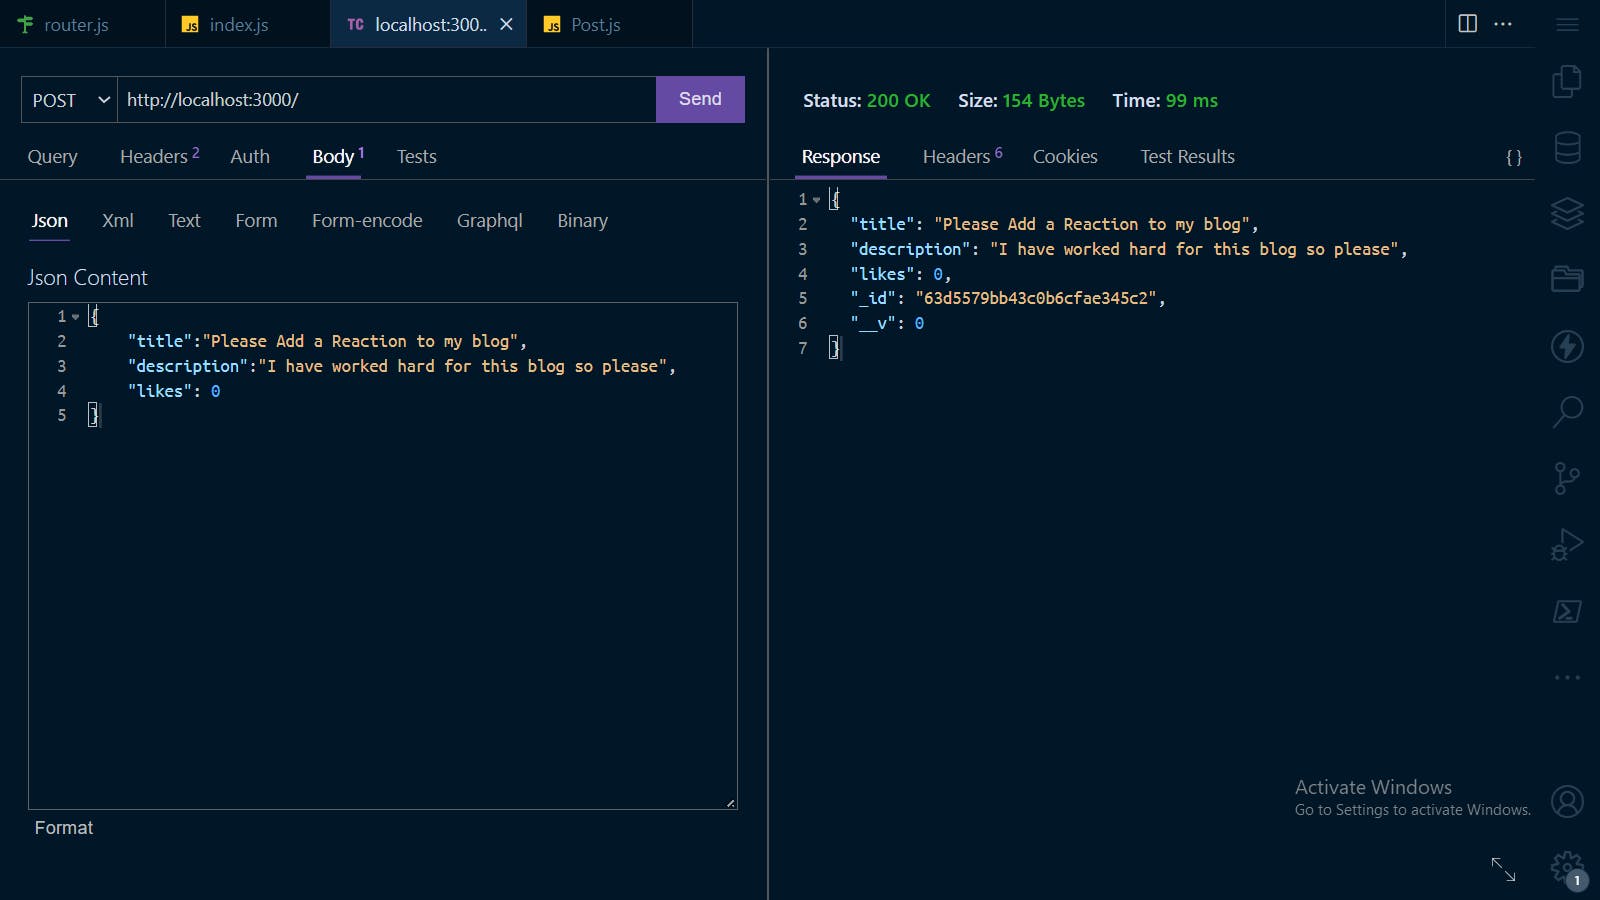
So the document creation function is working and it also gave us the id of the document. And since we have the id let's test the get one post by id function
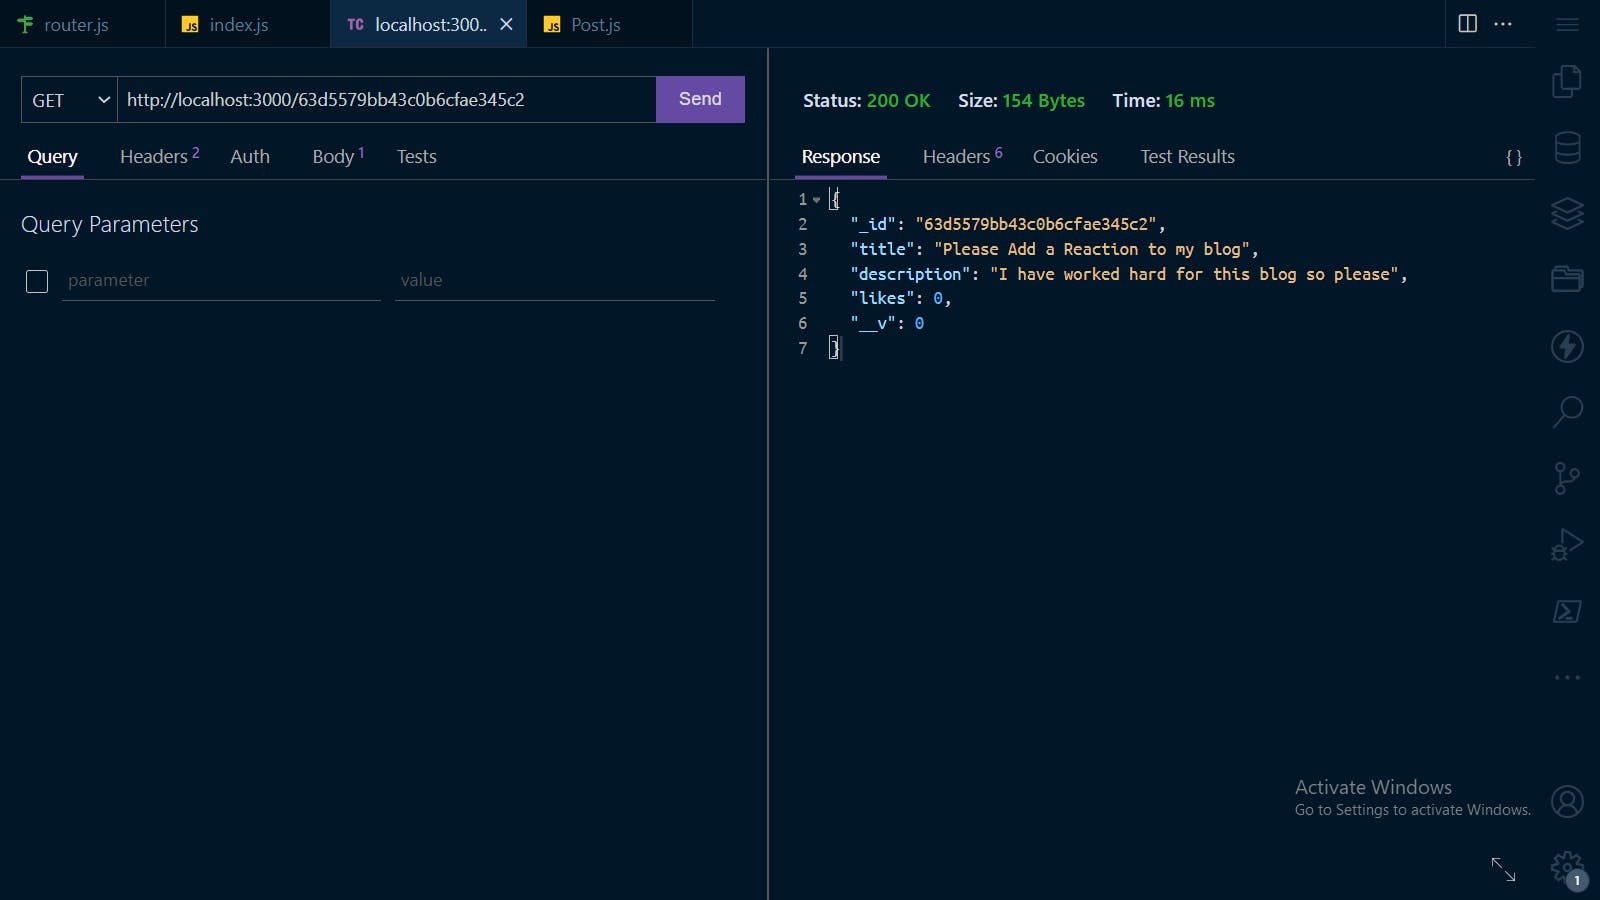
GET ONE request
copy the id that was in the response body and change the request type to GET and change the URL to localhost:3000/your_post_id see if it returns the results (BTW the id is _id key in the result data)
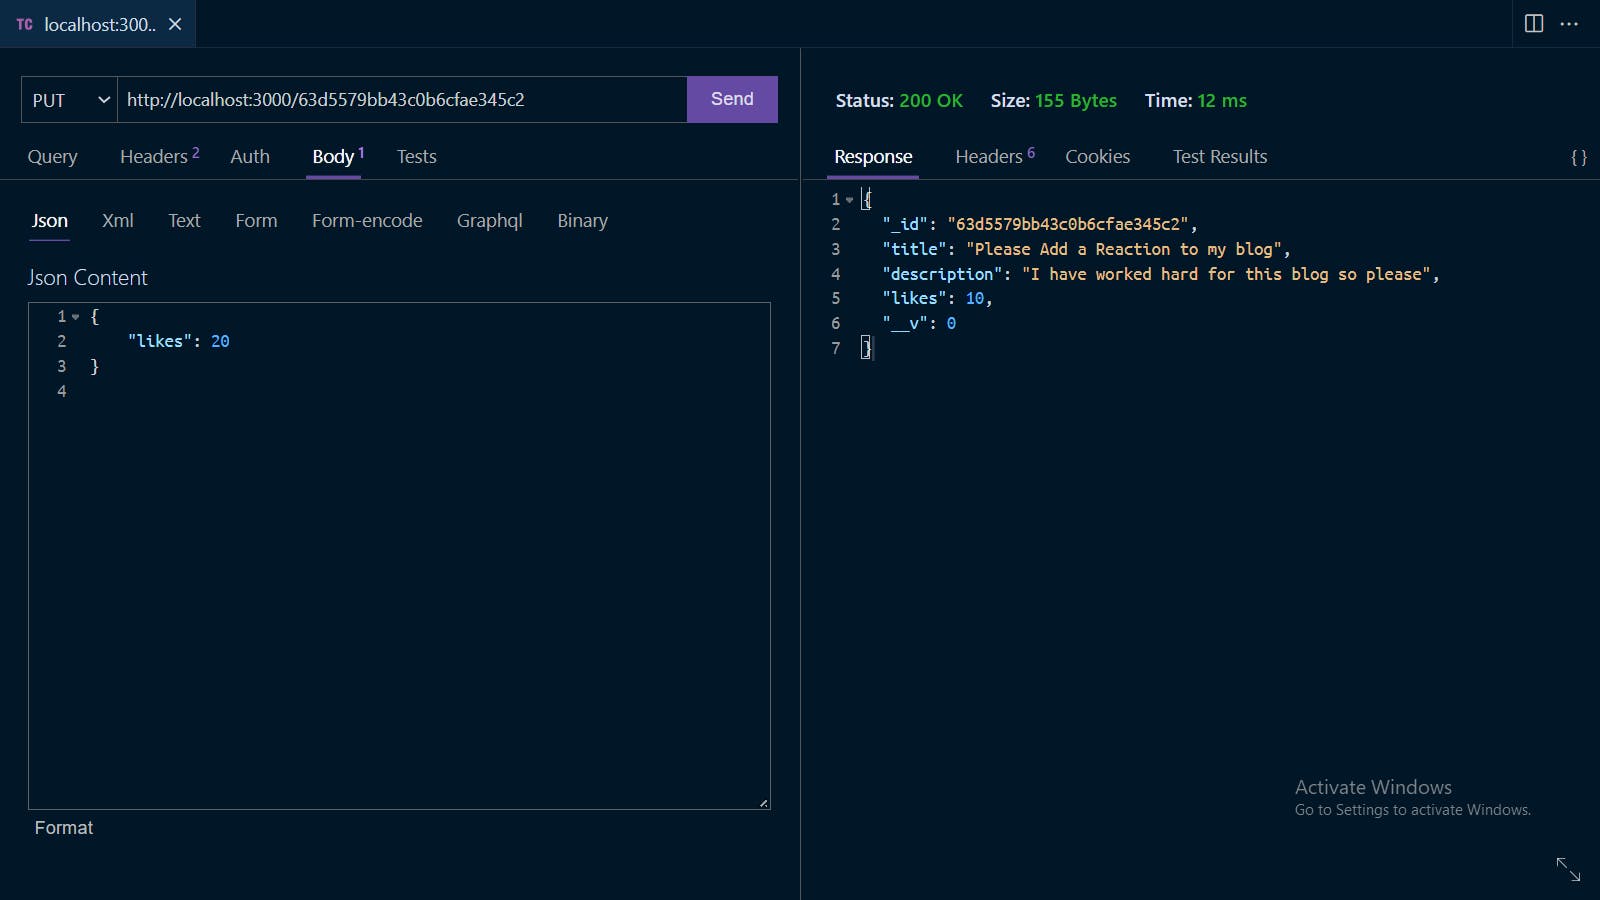
UPDATE request
Keep the URL with the id of the post and change the request method to PUT
then in the body type in what you want to change in that document
{
    "likes": 20
}
In here i am just updating the likes you can update anything you want😇
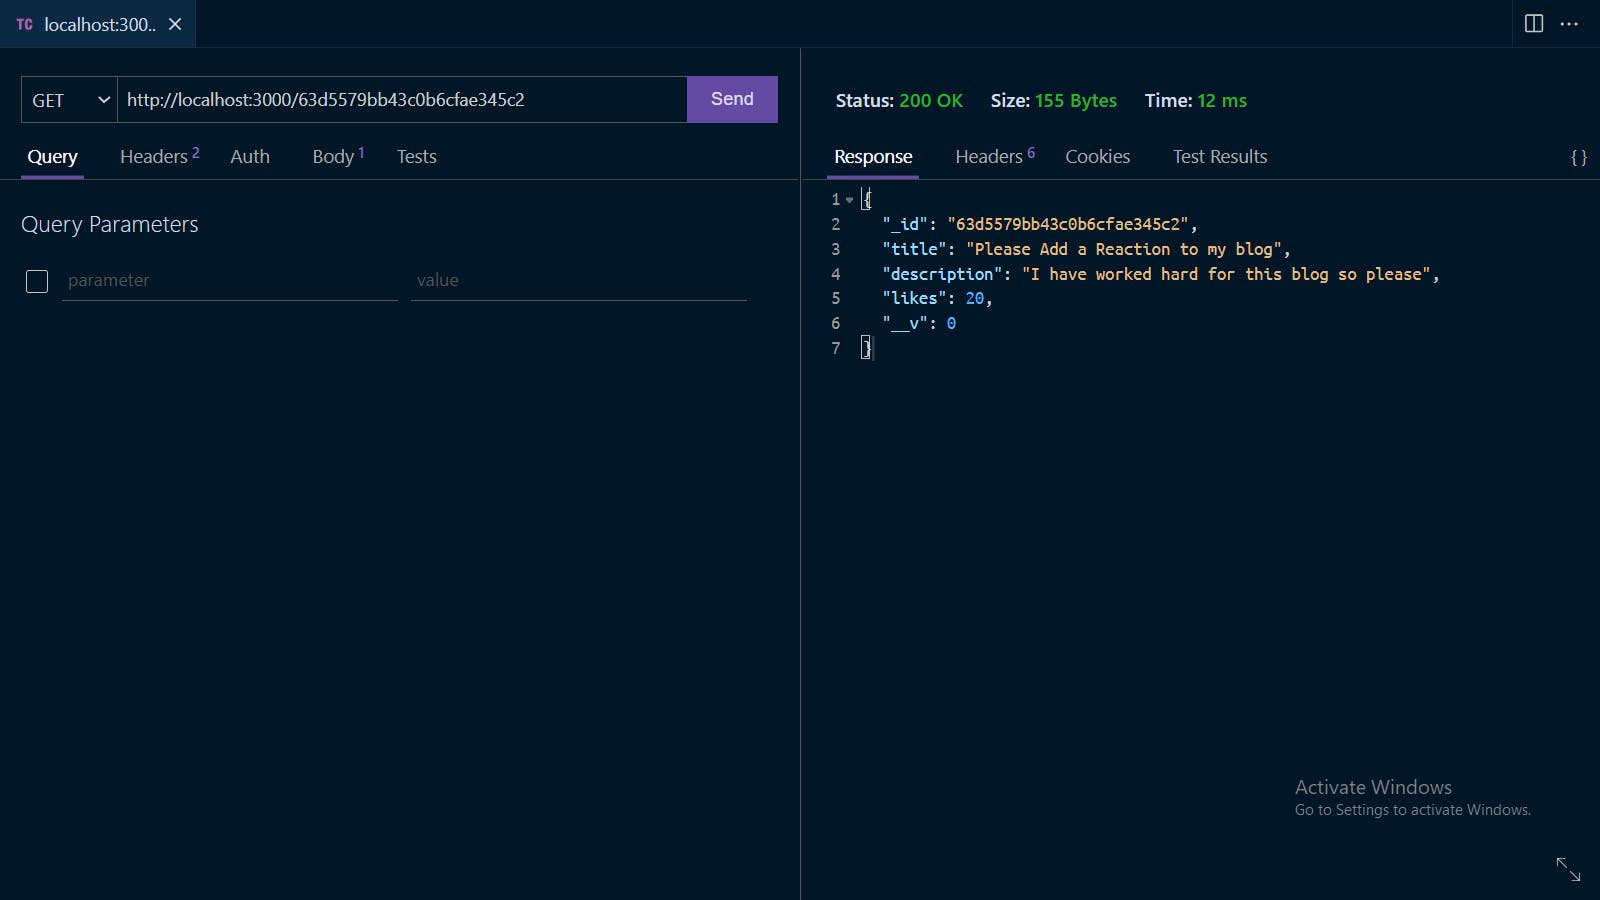
To Check if the post is updated use the get one request
DELETE Request
as always change the type to DELETE we don't need a body and we need the request to have the post id

To check if the post still exists let's use the get one request with the same post id

Here we get null which means the post does not exist. Usually, if there is no result to be returned we will send back a response of 404 status it is not needed in this small project but in case you are wondering how to then here is the example for get one route
// get one post
router.get("/:id", (req, res) => {
    Post.findById(req.params.id, (err, post) => {
        if (err) {
            res.status(500).send(err);
        } else {
            if (!post) return res.status(404).send({message:"Post Not Found"});
            res.json(post);
        }
    });
});
You can put the if line in every get, put, and delete request. but not in the post and get all route too.
And Now Instead of null we get

Everything worked yaaay!🔥🔥🔥🎇🎇🎆🎆🙌🙌🙌
Everything now workers now then we can clean the code a little bit
In the function such as get one request, put request, delete request
In these function and inside the callback functions such as Post.findById, Post.findByIdAndRemove and findByIdAndUpdate
if (err) return res.status(500).send(err);
if (!post) return res.status(404).send({ message: "Post Not Found" });
res.json(post);
now this is more better and clean way of writing the callback function🤜
get Inside the get all request in the Post.find callback function and change it to this
if (err) return res.status(500).send(err);
res.json(posts);
The API will work fine without all of this but this is cleaner
Congragulations You Just Created and Tested Your First CRUD API!
BONUS
I promised a bonus there it is
When hosting your app the PORT will be given by the provider.In our app now we are just using the static port 3000 we have to change this.so in the variable section in index.js file,add a new variable named PORT which will take the PORT given by the provider in the environmental variables or if not found use ours
const PORT = process.env.PORT || 3000;
And in the app.listen() function at the end change it to this
app.listen(PORT, async() => {
    console.log(`Server is running on port ${PORT}`);
});
Now the PORT is dynamic.
THE APP IS READY FOR DEPLOYMENT
now you can deploy the app to platforms such as railway, render and Heroku
I will be creating a blog on how to deploy a node js app.so follow me and stay toned😀
Good Luck On Your Jurney Developer hope we meet again 👋